Sunday 7 February 2016

Dee's Carrot Cake - The Gluten Free Version


A beautiful Scottish friend Dee gave a group of her school mum friends this amazing carrot cake recipe a few years back, which I have adapted to a gluten free version. It has long since been a very popular cake in my house and among friends.  It's moist and flavoursome with a lovely hint of cinnamon spice, complemented by decadent cream cheese icing. 


Preheat oven to 175 degrees C. Grease and line a medium size cake tin. 


1 teaspoon vanilla extract
3 eggs
3/4 cup firmly packed brown sugar (we like light brown Muscovado as it is unrefined)
1/2 cup olive oil or melted coconut oil
2 cups grated carrot
1 cup peeled and grated pear or apple

Mix the above ingredients together in a large bowl.

Dry Ingredients

3/4 cup plain gluten free flour
150gm packet almond meal
1/2 teaspoon salt
1 & 1/3 teaspoon baking powder
1 & 1/3 teaspoon baking soda
1 & 1/2 teaspoon cinnamon

Sift all the dry ingredients together.

Pour the dry ingredients into the wet ingredients and mix with a wooden spoon until well combined.  Pour into cake tin and bake for approx 50 to 60 minutes.  Leave in tin for 5 minutes before turning onto a cooling rack and ensuring cake is completely cool before icing.

Cream Cheese Icing

150gm (or more according to taste) cream cheese, softened
250gm (approx) icing sugar, sifted
3 tablespoons softened butter/olive oil spread
1/2 to 1 teaspoon lemon juice - just add a small amount at a time

Mix these ingredients with an electric beater, adjusting cream cheese/icing sugar according to taste and ensuring a nice thick texture.

Enjoy! X


Wednesday 18 November 2015

Gluten Free Banana Chocolate Chip Muffins


Spring is well underway and with the warmer weather, the bananas in our fruit bowl are ripening at a pace we can't keep up with.  Cue banana baking recipes for the school lunch boxes.

These gluten free banana chocolate chip muffins are delicious, filling, have some beautiful superfood and ancient grain ingredients and most importantly, get the big thumbs up from the kids! In this recipe we've incorporated banana flour made from Australian green bananas. It's gluten free and rich in dietary fibre.

Ingredients

1 cup sorghum flour
1/2 cup banana flour (naturalevolutionfoods.com.au)
1/4 cup tapioca starch
1 teaspoon xanthan gum
1/2 cup packed brown sugar - (we like the unrefined kind, e.g. muscovado sugar)
2 teaspoons baking powder
1 teaspoon baking soda
1 tablespoon ground chia seeds
1/2 teaspoon salt
2 large eggs
1/3 cup oil
1/2 cup sour cream or plain yoghurt
1/4 cup milk
1 teaspoon vanilla extract
1 cup ripe bananas mashed (approx 2 medium bananas)
3/4 cups gluten free/nut free chocolate chips (always check the packet)

1) Grease or line a muffin tin. Preheat oven to 180 degrees C.

2) In a large mixing bowl, sift together the sorghum flour, banana flour, tapioca starch, xanthan gum, sugar, baking powder and baking soda. Then stir in the ground chia and salt.

3) In a medium mixing bowl, whisk together the eggs, oil, sour cream, milk vanilla extract and mashed bananas. Pour the wet ingredients into the dry ingredients and stir just to combine. Fold in the chocolate chips.

4) Spoon the batter into muffin tin. Bake for 20-25 minutes or until a skewer comes out clean.

5) Allow to cool for a few minutes before removing from muffin tin and placing on a cooling rack.  Cool completely before storing in an airtight container for up to 5 days.


Wednesday 21 October 2015

Coriander Pesto (Or Cilantro if you Happen to be American)

Happy Coriander
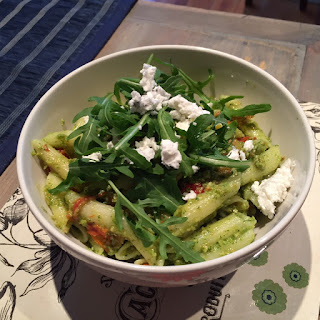
After some unsuccessful attempts at coriander cultivation in our herb garden, I was thrilled to see we'd finally made some progress.  I love a flavoursome pesto and thought I'd whip one up for a mid-week pasta.  This recipe was one from bestrecipes.com.au that I adapted slightly.

NB: I buzzed this up in my food processor, but for those lucky Thermomix owners - even easier -  (please tell my hubby I NEED one) 

2 cups of coriander with stems - give it a good rinse
2 cloves of chopped garlic
3/4 to 1 cup of unsalted cashews (I followed the recipe and used 1 cup, but personally think 3/4 cup would be a better balance - up to you depending on whether you prefer more coriander flavour to come through or you like the extra nuttiness)
4 tablespoons of macadamia nut oil - the really real virgin olive oil can sometimes have a slightly bitter aftertaste, hence the macadamia oil but again, up to you
1 lemon juiced
4 tablespoons of grated parmesan cheese
salt and pepper to taste

Briefly blitz all the ingredients except the oil and then slowly add the oil while you continue blitzing.  And your pesto is done! 


I cooked up some gluten free penne pasta, added some roasted then peeled capsicum (hint - roast capsicum in oven on high temp until they've softened and have slightly blackened skin, take out of oven and cover for a few minutes to sweat making peeling off the skin much easier), some halved and oven roasted cherry tomatoes, a bit of rocket and goats cheese on top.  Get as creative as you want with what you add. 

Delicious! 

Wednesday 19 November 2014

The Reluctant Star??


My very supportive hubby is fairly used to being sidelined when it comes to any Eve’s Better Bake media. Since the business began, he has jokingly complained about never being invited to be one of the faces of our company. “Why can’t I be on the website?” he says in jest “ I can be the eye candy” he jokes.  Well, we’ve finally called his bluff. Several weeks ago, we filmed a branding video with the talented and inspiring Jennifer Parlanti from Paper Box Media.  My hubby was asked to be in one of the starring roles, as the all important senior pastry chef and nurturer of his two young chefs as they created delicious baked goodies for afternoon tea.  I think he was quite chuffed to be in the forefront for once and slotted into the role with ease.  I also have to hand it to him, the cookies he and the girls whipped up, were very tasty!

Filming our video was an adrenalin filled, exhausting day but one our family will never forget.  We can’t wait to share our video with you all very soon, right as we launch our new products!

Eve xx


Tuesday 21 October 2014

Salad Season: Walnut Quinoa Salad

Eve’s Walnut Quinoa Salad


The weather is warming up, we’ve come out of winter hibernation, ready for the busier social scene summer tends to invite.  After baking, my second love is putting together new and unique salad combinations.  This one was begging to be made in anticipation of lazy summer BBQ’s with family and friends and I had fun putting it together over the warm weekend.


One of my favourite ingredients is quinoa and not because it’s uber-cool but because it is healthy, delicious and versatile.   High in protein and many essential nutrients, quinoa contains a balanced combination of all essential amino acids.  There’s my spiel, now go and make this salad immediately!

To make a large size serve to feed 8-10 friends at a BBQ you need:
1.5 cups of Quinoa – rinsed
2 cups cold water
200gm block of firm fetta, chopped
340gm jar of roasted red pepper cut into strips (or roast your own - 2 red capsicums in oven 200C until blackened skin, then sweat in a freezer bag and peel off skin)
240gm can chickpeas, rinsed
150gm walnuts – lightly roasted (grill on tray, turning regularly – they burn quickly, so keep an eye on them!)
A large bunch of rocket to mix through salad

Dressing

1/3 cup Extra Virgin Olive Oil
3-4 tablespoons Balsamic Vinegar
Dash of sea salt and freshly cracked pepper
(You can adjust these amounts according to taste and amount required)

Instructions

1)      Soak quinoa in the cold water in a medium size pot for 15 minutes.  Then put on a medium heat until boiling with lid on. Reduce to a low simmer with lid for about 15 minutes until almost all the water is absorbed.  Stir with a fork and then leave to sit for a few minutes with lid on.  Transfer to a large bowl and leave to cool in fridge.

2)      After quinoa has cooled slightly add fetta, chickpeas, roasted pepper strips, rocket and mix together.

3)      For dressing, mix all ingredients together (a shaker is best) and stir into salad just prior to serving. Finally sprinkle salad with roughly chopped walnuts.

    Easy!


You can experiment with your own additions, e.g. change the type of nut, add corn kernels, sundried tomatoes, roasted eggplant or change the dressing – also nice with a pomegranate dressing.

Wednesday 15 October 2014

Gingerbread - Gluten Free, Nut Free, Dairy Free


My 7-year old has a friend coming to play after school today and I thought it would be nice to whip up a quick and easy gluten free gingerbread.  A lovely comfort treat on a cold, wet day like today.
This is a recipe I've adapted from the iconic Kiwi cook Alison Holst to make it dairy free, mostly refined sugar free and incorporating a more nutritious flour.


You Need:

¼ cup dairy free spread or butter (I used Nuttlex Olive)
1 Household tablespoon golden syrup (a household tablespoon size is 1 standard tablespoon plus a bit more)
½ cup firmly packed muscovado sugar (or brown sugar, I like muscovado because it's unrefined)
1 egg
½ cup Mt Uncle’s Banana Flour* (or ½ cup brown rice flour) 
½ cup tapioca flour
1 teaspoon xanthan gum
2 teaspoons ground ginger
1 teaspoon cinnamon
1 teaspoon baking soda
2/3 cup rice milk

Instructions
1)      Preheat oven to 180C. Grease and line small loaf tin with baking paper.
2)      Melt the dairy free spread and golden syrup together in a medium-sized pot. Take off heat and beat in sugar then egg with a wooden spoon.
3)      Add in remaining dry ingredients except the baking soda.  Beat with a wooden spoon.
4)      Dissolve baking soda in milk, then add to mix, beating in with a wooden spoon.
5)      Pour mixture into tin, then bake for 25-30 minutes until a skewer comes out clean.
6)      Leave in tin for 5 minutes before turning onto cooling rack
7)      Serve warm or cool – nice with dairy free spread or butter!

Yum!

Post script: This recipe was given the double thumbs up by two 7-olds and a 9-year old after school today :) 

*I am most definitely not being paid for this, but thought I’d mention Mt Uncle’s Banana Flour in case you didn’t already know about it.  This unique flour is made from 100% Australian Bananas, it is gluten free (of course) and is a resistant starch, which is low GI and super good for your digestion.  You can find it online or check out their website for info on their stockists.

Sunday 28 September 2014

The Age of the Coconut

Nectar of the gods?

So who knew the humble coconut and all it derivatives would become the ‘it’ thing.  I must admit, I became a convert a couple of years ago, finding no better way to quench my thirst than to sip on chilled coconut water on a hot day.  Last summer my daughters and I took regular delight from madly hacking into a drinking coconut, thrusting three straws in its gaping wound, knowing full well fastest sipper gets the most coconut water.  As a side note I might add that I was wielding the knife not the kids, but my husband is that certain my haphazard knife skills are one day destined to equate to loss of digits, I’m sure he would almost prefer that it was the 7 year old doing the honours.

Managing to enjoy fresh coconut water with the added bonus of retaining all 10 fingers, I have since branched out further in my coconut consuming journey.   Coconut oil.  I know I’m not telling you anything new here, with all the hype, I’m sure you’re well aware that this medium-chain saturated fatty acid is said to be bursting with health benefits. Increasing evidence suggests that it can potentially help with weight loss, boost metabolism, lower cholesterol, aid digestion and support immunity among other things.  It’s got to be the virgin, additive free kind mind.  One example here of many such articles touting the benefits of this miracle stuff:  


I for one, have embraced coconut oil wholeheartedly, bringing it into my life in a number of different ways:

1)      Moisturising with it – I get very dry skin and sometimes I feel like my regular moisturiser just won’t cut it. That’s when I slather on the coconut oil. Works a treat.

2)      Baking with it. Baking needs fats and oils for texture and moistness.  I find coconut oil works beautifully in many cakes, muffins and biscuits.  Plus it’s better for you than butter.

3)      Frying with it – has a slightly higher smoke point than olive oil before the oxidisation process starts to occur, although it's not as high as rice bran oil or avocado oil. 

4)      Oil pulling – now this is an interesting concept and one I recently thought I would give a crack. This is based on an ancient Ayurvedic technique where you swish oil all around your mouth for 5-20 minutes to help remove any nasty mouth bacteria that contributes to plague and gum disease.  Be very careful not to inhale it (this is definitely not for children) and it must be spat into the bin not swallowed, not in sink. As a side note I did get top marks from my dental hygienist recently for excellent oral health so perhaps there is really is something in this oil pulling?

You may or may not buy into all the hype surrounding coconut oil.  For me? If it was good enough for the Ayurvedic Indians then it’s good enough for me.


*this story is the opinion of the author and is not health advice. Where necessary, ensure you seek advice from a qualified healthcare professional.